“Is your newly replaced roof as good as it looks? Believe it or not, even brand-new roofs can have hidden issues. This blog post will provide a step-by-step guide on thoroughly inspecting your new roof after replacement, ensuring quality workmanship and peace of mind.
Grab a coffee, and let’s dig into the details!”.
Key Takeaways
- Inspecting your new roof after replacement is crucial to ensure its quality and workmanship and identify any issues or deficiencies that must be addressed.
- Post-replacement inspections help ensure the structural integrity of your new roof and can provide peace of mind in real estate transactions.
- Hiring a professional inspector is recommended for a thorough assessment, but homeowners can also perform DIY inspections using specific tips in the article.
- The inspection should be conducted shortly after the roof replacement is complete and scheduled at least once per year, with twice-yearly inspections being ideal. It’s essential to schedule an inspection before colder months arrive or after major weather events like hail storms.
- During the inspection, key areas to check include the overall appearance and condition of the roof, proper installation techniques, flashing and seals, ventilation systems, and drainage. Addressing any issues promptly can prevent costly repairs down the line.
Importance of Roof Inspection After Roof Replacement

Inspecting your new roof after replacement is crucial to ensuring its quality and workmanship and identifying any issues or deficiencies that may need to be addressed.
Why is it necessary?
Ensuring the structural integrity of your new roof is a primary reason why post-replacement inspections are necessary. They form an essential part of maintenance, allowing you to catch and address issues or defects that may have occurred during the replacement process.
Besides improving roof integrity, these inspections can provide peace of mind in real estate transactions, assuring buyers that the installed roof is in good condition. If your home’s roof is older than 10 years or has had frequent problems, annual inspections become critical to prevent extensive damage from overlooked issues like needed shingle or gutter replacements.
Ensuring quality and workmanship
Quality assurance is a key factor right after a roof replacement. It’s vital to hire a professional roofing company that can provide an in-depth inspection, ensuring superior workmanship standards have been met during the installation process.
With this examination, contractors meticulously review different roof components to confirm their structural integrity.
The importance of this step shouldn’t be underestimated, as it helps identify any early warning signs for potential repairs or replacements on residential shingle roofs. A thorough review using specific inspection checklists ensures that no aspect has been overlooked and that every part of your new roof remains in good condition.
Such proactive measures play a significant role in prolonging the lifespan of your rooftop while safeguarding your investment.
Identifying any issues or deficiencies
Roof inspections offer a reliable method for spotting deficiencies in your roof replacement. Scheduling an annual roof inspection could catch problems before they escalate, helping you prevent insidious issues that are often harder to address.
This practice is particularly important if the roof is older than 10 years or has shown recurring problems. A thorough check can highlight potential concerns and ensure quality workmanship in the recent replacement.
From incorrect installation to faulty flashing and seals, deficiencies may vary, but each has the potential for significant damage. Therefore, identifying these issues early on is vital for maintaining your new roof’s health and saving on future repair costs.
When to Conduct the Inspection and Who Should Perform It

The inspection should be conducted shortly after the roof replacement is complete, and it can be performed either by a professional inspector or as a DIY project for homeowners.
Timing of the inspection
Scheduling a roof inspection at the right time is crucial for maintaining the integrity of your new roof. Having your roof professionally inspected at least once per year is recommended, with twice-yearly inspections being ideal.
To ensure enough time for any necessary urgent repairs, it’s best to schedule the inspection well before colder months arrive. Additionally, after a major weather event like a hail storm, scheduling a roof inspection is advisable to assess any potential damage.
However, consider that conducting an inspection immediately after a roof replacement may not be necessary since many of the reasons for inspection are irrelevant to a newly replaced roof.
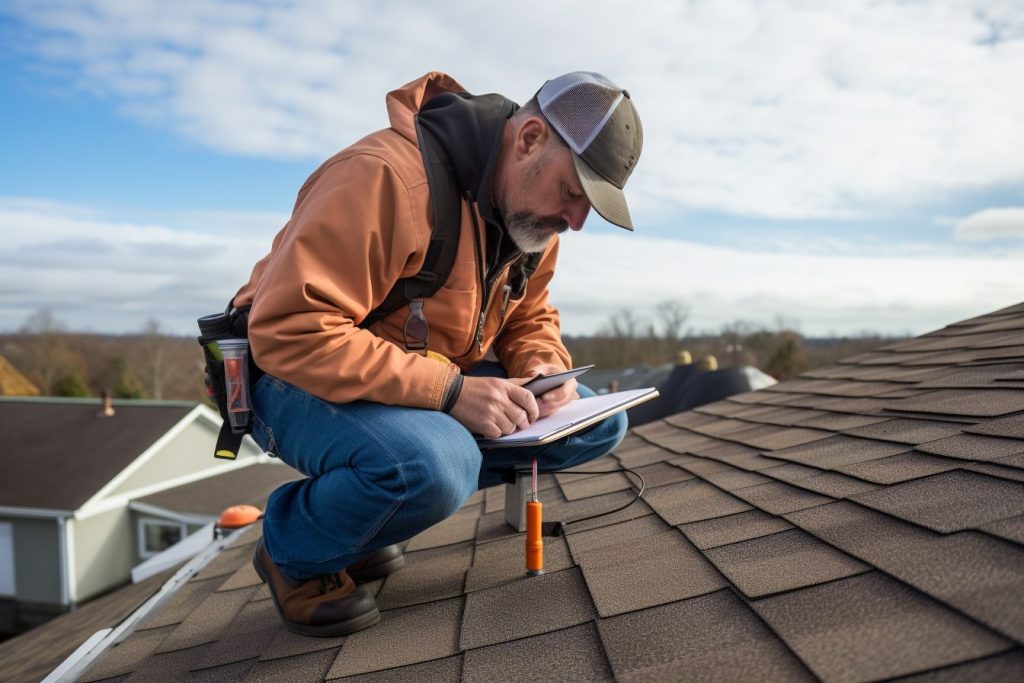
Hiring a professional inspector
A professional roof inspector is essential when conducting a thorough assessment of your newly replaced roof. These trained experts have the knowledge and expertise to identify any hidden issues or potential damage that may not be visible to an untrained eye.
By hiring a certified inspector, you can ensure that every aspect of your roof is carefully examined, from the quality of installation to leak detection and overall condition. This provides peace of mind and the assurance that necessary repairs will be identified and addressed promptly.
DIY inspection tips
Regular inspections on your new roof are crucial for its longevity and durability. Here are some DIY inspection tips to help you maintain your roof:
- Clean gutters and downspouts regularly to prevent leaves, debris, and stagnant water buildup.
- Look for signs of damage, such as cracked or missing shingles, loose flashing, or damaged seals around vents and chimneys.
- Check for areas where water may pool on the roof, leading to leaks and structural damage.
- Inspect the attic for any signs of water stains or mould growth, which could indicate a leaky roof.
- Trim any overhanging tree branches that could scrape or damage the roof during strong winds or storms.
- Look for any signs of moss or algae growth on the roof surface, which can lead to deterioration if left untreated.
- Look for signs of wear around rooftop vents and skylights, ensuring they are properly sealed and not allowing water penetration.
- Regularly remove debris or leaves that may accumulate on the roof surface, as they can trap moisture and cause decay.
What to Check During the Roof Inspection

During the roof inspection, you’ll want to check your new roof’s appearance and condition, ensure proper installation, inspect flashing and seals, and assess ventilation and drainage.
Don’t miss these crucial steps to ensure a secure and durable roof for years. Keep reading to learn more!
Overall appearance and condition
Inspecting your new roof’s appearance and condition ensures its longevity and performance. A professional roofing inspector will carefully assess the roof’s exterior, checking for any visible signs of damage or wear, such as missing or damaged shingles, cracked tiles, or loose flashing.
They will also inspect the gutters and downspouts to ensure proper drainage. An inspector can identify potential issues early on by thoroughly examining these elements and recommend necessary repairs or maintenance to keep your roof in optimal condition.
Regular inspections are essential for catching problems before they escalate into costly repairs or cause water infiltration that could damage your home’s interior.
Checking for proper installation
During a roof inspection, it is crucial to check for proper installation to ensure the longevity and performance of your new roof. Here are some key areas to focus on:
- Look for any signs of sagging, which can indicate improper installation.
- Inspect the shingles or roofing material to ensure they are aligned correctly and securely fastened.
- Check for any loose or missing nails, which can compromise the roof’s integrity.
- Examine the flashing around chimneys, vents, and other protrusions to ensure they are properly sealed and in good condition.
- Inspect the gutters and downspouts to ensure they are correctly attached and functioning.
- Assess the overall appearance of the roof to identify any visible issues or inconsistencies.
Inspecting flashing and seals
Inspecting flashing and seals is a crucial step in the roof inspection process. It helps identify potential vulnerabilities or signs of water infiltration. During the inspection, trained roofing inspectors carefully lift shingles to check for any damage or issues. They also examine the flashing and seals around roof penetrations, such as pipe boots, to ensure they are correctly installed and sealed. Regular inspections, including checking flashing and seals, are recommended at least once a year and after severe weather conditions to maintain the integrity of your roof.
Assessing ventilation and drainage
Assessing the ventilation and drainage is crucial to inspecting your new roof. Here are the key areas to check:
- Examine the attic’s ventilation system to ensure it is functioning correctly.
- Look for any improper airflow or blockages that may affect the ventilation system’s performance.
- Check for adequate insulation to prevent heat loss or gain.
- Inspect the drainage system for clogs or damage, including gutters and downspouts.
- Look for signs of water infiltration, such as stains, mould, or mildew in the attic or ceilings.
- Assess the condition of shingles and flashing around vents and chimneys to ensure they are securely installed and not causing any leaks.
- Pay attention to any damage or wear on roofing materials that could lead to future issues.
Your Complete Guide to Roof Replacement

A roof replacement is a significant investment for any homeowner, and understanding the process can help ensure a successful outcome. Here is your complete guide to roof replacement.
Firstly, before starting the project, inspecting the existing roof to assess its condition is crucial. This inspection will help identify potential issues that may need addressing during the replacement process.
Next comes the tear-off stage, where the old roofing materials are removed. This step allows for a fresh start with a clean slate. Once this is done, it’s time for installation, where new roofing materials are carefully placed and secured in your home.
After completing the installation, conducting a meticulous inspection of your new roof is essential. This inspection ensures that everything has been correctly installed and meets all required standards.
It also allows you to address any concerns or issues immediately.
During this inspection, pay close attention to factors such as structural soundness and the overall appearance of the roof. Check for proper installation techniques and inspect flashing and seals thoroughly.
Assess ventilation systems and ensure proper drainage is in place as well.
By following these steps in your complete guide to roof replacement, you can be confident in having a sturdy, long-lasting roof that protects your home from external elements effectively.
Now, let’s discuss what steps should be taken if any issues are found during this post-replacement inspection.
Steps to Take If Issues are Found

If any issues are found during the roof inspection, it is important to document them and contact the roofing contractor immediately to address warranty and insurance concerns. Take necessary actions for repairs or corrections to ensure a secure and sturdy roof.
Documenting the issues
When conducting a roof inspection after replacement, it is important to document any issues. This documentation serves as an official record of the problems and can be used for future reference or in case of any disputes with the roofing contractor.
By keeping detailed notes and taking photographs of the issues, you have evidence to support your claims and ensure that necessary repairs or corrections are made. Documenting the issues allows you to accurately report your findings to the roofing contractor and discuss warranty or insurance concerns if needed.
So, take the time to document any problems discovered during your roof inspection process thoroughly.
Contacting the roofing contractor
If any issues are found during your new roof post-replacement inspection, promptly contact the original roofing contractor. This step is crucial because they are familiar with the installation process and can address any concerns or deficiencies that may have been overlooked.
By contacting the roofing specialist, you can ensure that necessary repairs or corrections are made on time, helping protect your investment and maintain the quality of your new roof.
Addressing warranty and insurance concerns
Addressing warranty and insurance concerns is crucial if any issues are found during a roof inspection post-replacement. It’s essential to promptly document the issues and contact your roofing contractor to discuss the warranty coverage.
Understanding your insurance policy is also essential, as insurance companies may request a roof inspection for various reasons. However, it’s important to note that not all types of roof damage may be covered by insurance.
Familiarize yourself with common denial reasons and ensure proper damage coverage is in place. By taking these necessary actions, you can have peace of mind knowing that your family is protected and any potential problems with your new roof will be resolved efficiently.
Taking necessary actions for repairs or corrections
To ensure that your new roof is structurally sound and in good condition, it is important to take necessary actions for repairs or corrections if issues are found during the inspection. Here are some steps you can take:
- Document the issues: Take clear photos and notes of any problems or deficiencies you notice during the inspection. This documentation will be useful when discussing the issues with your roofing contractor or insurance company.
- Contact the roofing contractor: Reach out to the contractor who performed the replacement and inform them about the issues you have discovered. Provide them with your documentation and ask for their assistance resolving the problems.
- Address warranty and insurance concerns: Check your warranty details and contact your insurance company if necessary. Discuss any coverage options they may offer for repairs or corrections identified during the inspection.
- Take necessary actions for repairs or corrections: Work with your roofing contractor to determine the best course of action to address the identified issues. This may involve scheduling repairs, replacements, or adjustments as needed.
- Resolve any dispute through negotiation or mediation: If there are disagreements between you and the roofing contractor regarding responsibility for specific issues or how they should be resolved, consider seeking dispute resolution services such as negotiation or mediation to find a fair solution.
Maintaining and Protecting Your New Roof

Regular cleaning and maintenance, keeping gutters and downspouts clear, monitoring for signs of damage or wear, and considering preventive measures such as roof coatings or treatments are essential for maintaining and protecting your new roof.
Regular cleaning and maintenance
Regular cleaning and maintenance are crucial for keeping your new roof in good condition. By following a few simple steps, you can ensure that your roof stays in optimal shape and continues to protect your home. Here are some crucial tasks to include in your regular roof care routine:
- Cleaning the roof surface to remove debris, leaves, and branches that can lead to water pooling and damage.
- Inspecting shingles regularly for any signs of damage, such as cracks, curling, or missing pieces. Repair or replace damaged shingles promptly.
- Checking and maintaining flashing around chimneys, vents, and skylights to prevent leaks.
- Clearing gutters and downspouts of leaves and other debris ensures proper drainage and prevents water backup on the roof.
- Monitoring for signs of mould, moss, or algae growth on the roof surface. Clean these areas using appropriate solutions or treatments.
- Keep an eye out for any loose or damaged seals around pipes and vents. Repair or replace them if necessary.
Keeping gutters and downspouts clear
Keeping your gutters and downspouts clear is important to maintain and protect your new roof. This will help prevent water damage and ensure your gutter system functions properly. Here are some tips for keeping your gutters and downspouts clear:
- Regularly clean your gutters by removing debris, dirt, and leaves that can clog the system.
- Clear any blockages in the downspouts to allow water to flow freely.
- Consider hiring professional gutter cleaners for a thorough cleaning and inspection.
- Be proactive with gutter maintenance to prevent clogs and potential roof leaks.
- Check your gutters at least twice a year and after storms to catch any issues before they become significant problems.
- If you are installing a new roof, consider replacing your gutters simultaneously to avoid separate projects.
Monitoring for signs of damage or wear
It is crucial to monitor your roof for signs of damage or wear regularly. This will help you identify potential issues early on and prevent further damage. Here are some key things to look out for:
- Cracked, curled, or missing shingles
- Discoloration or dark streaks on the roof surface
- Deteriorated flashing around chimneys, vents, and skylights
- Sagging or uneven areas on the roof
- Accumulation of debris or moss growth
Considering preventive measures such as roof coatings or treatments
It’s important to consider preventive measures such as roof coatings or treatments to protect your new roof and prolong its lifespan. These options can provide an extra layer of protection against weather elements and extend the life of your roof. Here are some key considerations to keep in mind:
- Types of roof coatings: Explore different roof coatings available, such as acrylic, silicone, or elastomeric coatings. Each type has its benefits and suitability for specific roofing materials and climates.
- Reflective properties: Look for roof coatings that have reflective properties, which can help reduce heat absorption and keep your home cooler during the hot summer months. This not only improves comfort but also helps lower energy costs.
- Waterproofing capabilities: Opt for a roof coating that offers excellent waterproofing capabilities to prevent leaks and water damage. Ensure the coating provides a seamless barrier that seals any potential entry points for moisture.
- UV protection: Choose a roof coating that provides UV protection to minimize damage caused by the sun’s harmful rays. UV-resistant coatings can help prevent premature ageing and deterioration of your roof.
- Compatibility with existing roofing materials: Before applying any coating, ensure it is compatible with the material used in your existing roofing system to ensure proper adhesion and performance.
- Application process: Consider whether you want to apply the coating yourself or hire a professional contractor experienced in roof coating applications. Following manufacturer guidelines is crucial to ensure proper application and maximize effectiveness.
- Maintenance requirements: Understand the maintenance requirements associated with the chosen roof coating option. Some coatings may require periodic inspections, reapplications, or touch-ups to maintain their protective properties.
Conclusion
In conclusion, conducting a roof inspection after a replacement is crucial to ensure the quality and workmanship of your new roof. Identifying any issues or deficiencies early on can prevent potential leaks or other problems.
Whether you hire a professional inspector or do it yourself, regularly inspecting and maintaining your roof will help keep it in optimal condition for years.
FAQs
1. How soon should I inspect my new roof after replacement?
Inspecting your new roof within a week after the replacement is recommended to ensure everything is done correctly.
2. What are some signs of potential issues with a newly replaced roof?
Signs of potential issues with a newly replaced roof include missing or damaged shingles, leaks, sagging areas, or any visible gaps or cracks in the roofing material.
3. Can I walk on my new roof during the inspection?
No, walking on your new roof is not advisable as it may cause damage. Instead, use binoculars or take photos from ground level for closer inspection.
4. What should I do if I find any problems during the inspection?
If you find any problems during the inspection, contact your roofing contractor immediately and provide detailed information so they can promptly address and resolve the issue.
5. How often should I inspect my new roof post-replacement?
Inspecting your new roof annually is recommended to catch any potential issues early and prevent further damage that could lead to costly repairs down the line.